Requirements
Introduction
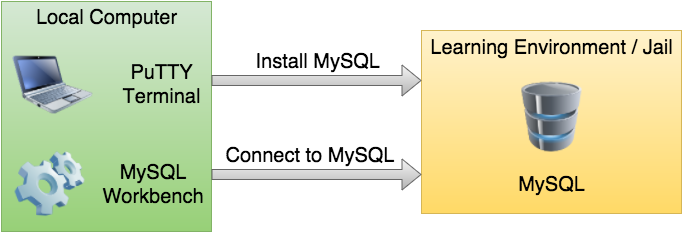
MySQL is a popular open source database and is often used in conjunction with the MySQL Workbench. This tutorial explains how to set up the MySQL Workbench. It is important to point out that MySQL has to be installed in your learning environment and the MySQL Workbench has to be installed on your local computer. The two-step procedure to set this up is shown in the figure below. First, you have to use PuTTY or the Terminal to install and configure MySQL, which is covered in this tutorial. Second, you have to use the MySQL Workbench to create a connection to MySQL, which is covered in this tutorial.
Download
Download the MySQL Workbench from here: https://dev.mysql.com/downloads/workbench/. Make sure that you download just the Workbench installer and not the MySQL installer (sometimes shown under recommended downloads), which contains other software besides the Workbench as well that you do not need and will only be confusing.
Installation
Open the downloaded file and step through the installation process. Then start the MySQL Workbench and create a new MySQL connection by clicking on the plus and enter the following information (replace username and password with your information):
Connection Name: username.it.pointpark.edu
Hostname: username.it.pointpark.edu
Password: password
Do not change any of the other fields. You can now make a connection.
Importing a Database
After opening a connection in the Workbench, right click in the left panel and select Create Schema. In this example, we will be importing the Heather Sweeney Designs database so we will use as Schema Name HSD. Under Default Collation select utf8 - default collation. Then click Apply, Apply again, and Close. If the database does not show in the left panel, right click and do Refresh All. Then right click on HSD and select Set as Default Schema. At this point the database has been created, but it does not contain anything yet.
We will now create the table structure and import the data, which is relatively simple. From the MySQL Workbench select File > Open SQL Script and navigate to the DBC-e07-MYSQL-HSD-Create-Tables.sql file (can be downloaded from the Blackboard). After opening the file click on the lightning bolt to run the script and it will create the tables for you. When you right click on HSD in the left panel and select Refresh All you will see the tables appear. Now you have to repeat the same steps to import the data, with the difference that this file is named DBC-e07-MYSQL-HSD-Insert-Data.sql (also available on the Blackboard).
Finally, let’s run an example query. Go to SQL File 1 (or open a New Query Tab) and enter
SELECT * FROM CONTACT;
and press the lightning bolt again. It will run the query and present the resulting records.
8 comments on “MySQL Workbench”